Netgear Wifi Extender Setup : A Comprehensive Guide to
Dependable WiFi Boosting
It’s time to think about installing a Netgear WiFi extender if you’re having trouble with WiFi dead zones or poor signals in specific parts of your house or place of business. One of the most often used options for increasing wireless coverage and signal quality is a Netgear extender. With easy installation choices and extensive functionality, Netgear wifi extender setup has become a go-to solution for households and small companies alike.
This tutorial will show you how to setup Netgear extender in a variety of ways, including web-based and WPS approaches, as well as how to solve frequent setup issues. You will find all the answers here, regardless of your level of expertise in networking or technology.
Technical know-how is not necessary to set up a Netgear wireless extender. Usually, all you have to do is plug it in, choose the appropriate network, and adhere to a few on-screen directions. For faster pairing, use WPS; for greater control, use the Netgear extender setup wizard in a web browser.
A Netgear WiFi Extender: What is it?
To increase your WiFi coverage, a Netgear wireless extender rebroadcasts the signal from your current router. It’s a well-liked method for getting rid of signal drop-offs in outdoor areas, basements, and upper stories.
Methods to Setup Netgear Extender
There are several methods for setting up a Netgear range extender. Follow the popular and successful techniques here:
Method 1: Configuring a Netgear WiFi Extender
If your router supports WPS (Wi-Fi Protected Setup), this is the quickest and easiest method to install your Netgear extender.
How To Setup Netgear WiFi Extender Steps:
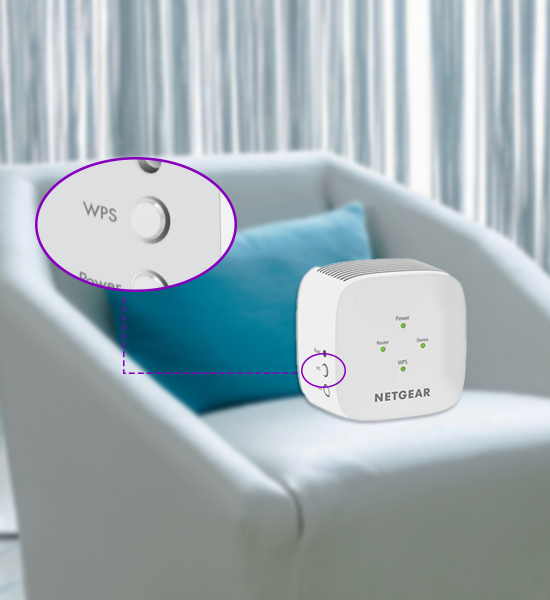
- Wait for the Power LED to stabilize after plugging your extender close to your primary WiFi router.
- Press the Netgear extender WPS knob.
- Press your router’s WPS knob.
- An efficacious connection will be specified when the extender’s Link LED turns solid green.
- Place the extender somewhere that is still within range of the router but has poor WiFi.
- With extended network connect your device.
Note: Depending on your device, the extended network might use the same SSID as your router or end it with _EXT.
Method 2: Configuring Netgear WiFi Extender Setup Without WPS
Use this method if you prefer a manual Netgear WiFi Extender Setup or if your router does not support WPS.
Actions to take:
- After connecting the Netgear extender, watch for the power light to steady.
- Navigate to the WiFi settings on your computer or mobile device and select NETGEAR_EXT.
- Launch a web browser and go to 192.168.1.250 or http://mywifiext.net.
- You will see the Netgear extender setup wizard.
- Click on “New Extender Setup”.
- For the extender admin panel, create a username and password.
- The extender will look for WiFi networks in the area.
- Enter the keyword for the WiFi network you presently use.
- After this for default settings leave the changed extended network name.
- Connect your devices to the newly expanded network after the Netgear WiFi Extender Setup is finished.
- When setting up a Netgear WiFi extender without WPS, this technique is frequently utilized.
Method 3: Configuring MyWifiext using a Web Browser
This approach is comparable with second method, but it emphasizes the proper way to access and utilize the mywifiext setup page.
Actions to take:
- Wait for the LED to turn green subsequently turning on the extender.
- To connect to NETGEAR_EXT WiFi, use a device.
- Launch your browser and type 192.168.1.250 or mywifiext.net.
- Subsequently click on “New Extender Setup”.
Follow the on-screen instructions to:
- Make an administrator login.
- Choose your current WiFi network.
- Enter the WiFi keyword appropriately.
- Select or validate your extended SSID.
- Reconnect your devices to the new network after completing the Netgear WiFi Extender Setup.
- This comprehensive, browser-based method is perfect for anyone who want to know “how to set up a Netgear WiFi extender manually.”
Method 4: Configure the Netgear WiFi extender in access point mode.
This configuration is utilized when you wish to establish a new WiFi access point by connecting the extender straight to your router using an Ethernet cable.
Steps:
- Use an Ethernet wire to connect your extender to the router.
- Wait for the LED to turn green after plugging the extender in.
- Connect to NETGEAR_EXT on your device.
- Launch your browser and go to mywifiext.net.
- When setting up, select “Access Point Mode.”
- Configure your security settings and network name.
- After everything is set up, position the access point where you want it.
- This is especially helpful in locations with erratic wireless backhaul or in buildings with Ethernet wiring.
Comprehending the Netgear Extender Configuration Process
One crucial item that shows up when you visit mywifiext.net is the Netgear extender setup process. It walks you through the process of choosing your WiFi network, naming the expanded network, inputting passwords, and checking the strength of the signal. It works with every model and is particularly useful when setting up a new Netgear extender.
Typical Problems with Netgear WiFi Extender Setup (And Solutions)
Users occasionally run into issues when setting up. Trail the typical problems and their solutions here:
The NETGEAR_EXT WiFi cannot be connected.
- Approach the extender.
- Cycle the device’s power.
- Try again after resetting the extender.
www.mywifiext.net It’s not loading
- Instead, use 192.168.1.250.
- Verify that you are allied to NETGEAR_EXT.
- Temporarily turn off your firewall, proxy, or VPN.
Router and Extender Not Connecting
- Verify your password entry one more time.
- Subsequently, put extender near the router.
- Using the dashboard, update the extender’s firmware
After Netgear WiFi Extender Setup, the signal is weak.
- Place the extender halfway between the dead zone and the router.
- Steer clear of physical obstacles like microwaves and walls.
- To improve stability, consider putting your device in access point mode.
How to Return the Netgear Extender to Its Initial Configuration
Resetting may be required if your extender isn’t functioning or if you’re making changes to your network configuration.
Steps:
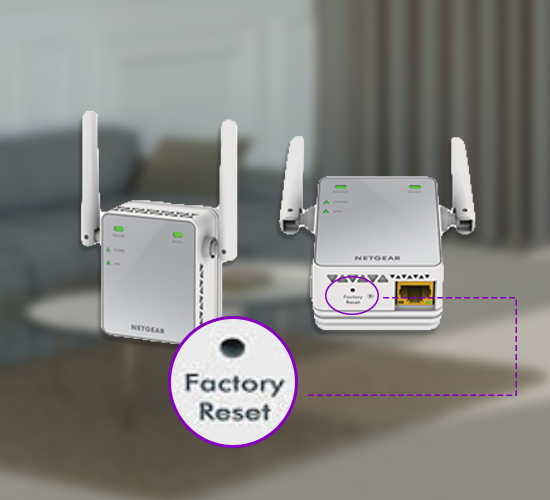
- Firstly, find the extender’s reset knob, which is often a tiny pinhole.
- Then using a paperclip or pin, press and hold it.
- Hereafter, when the power LED winks, let go of the knob.
- Now await the reboot of the extender.
- Subsequently, use any of the above techniques to restart the setup.
- Resetting restores the device to its initial configuration and deletes all previously saved settings.
Setup Extender for Netgear in Big Offices and Houses
A single router is sometimes unable to provide reliable WiFi throughout larger buildings or residences with many floors. Use gaps to fill the part for a Netgear network extender. To get the most coverage:
- First of all, keep the extender in halfway where it can reach thr router network.
- Whenever possible, use Access Point mode.
- Use a Netgear mesh range extender or several extenders for larger properties
Enhancing the Performance of Your Netgear Extender
To guarantee optimum performance, it’s a good idea to follow these steps after finishing the Netgear extender setup:
- Update firmware: Periodically check for updates on your extender through the mywifiext.net portal.
- Positioning: Attempt to position the extender midway between the area that requires coverage and your router. Keep it away from big metal items that might interfere with the signal and away from the router.
- Channel settings: To locate a clearer frequency if you encounter interference, you might wish to manually adjust the WiFi channel in the extender’s settings.
- Network management: To ensure smooth roaming, use the same SSID for both the main network and the extended network, or think about using different SSIDs for each.
To guarantee that you can effectively set up your Netgear extender, this article included comprehensive, step-by-step instructions. Every room of your house or place of business will have a dependable, fast WiFi connection with these troubleshooting and optimization recommendations.
FAQs
How can I use a mobile device to set up my Netgear WiFi extender?
To access the setup process, open a browser, connect to the extender’s default WiFi network, and go to mywifiext.net. To connect it to your router, adhere to the instructions displayed on the screen.
Does any router work with the Netgear WiFi extender?
Indeed, Netgear WiFi extenders are compatible with nearly all router brands. They employ common WiFi protocols like 802.11ac and 802.11n and are meant to be ubiquitous.
Does setting up a Netgear WiFi extender require software to be installed?
No further software is needed. Your device’s web browser may be used to set it up. The Netgear Nighthawk app is an optional tool for assisted setup.
Can I use a mesh WiFi system with a Netgear extender?
Mesh features are supported by certain Netgear extenders, particularly when used in conjunction with Netgear routers. Compatibility varies and may not offer full mesh capabilities for third-party mesh systems.
My Netgear extender keeps disconnecting; why is that?
Weak signal strength, interference, out-of-date software, or positioning too far from the router can all cause frequent disconnects. To improve stability, try moving it and upgrading the firmware.